FAQ-Full Access Cabinetry-Webstore
 FAQ-Full Access Cabinetry-Webstore - FAQs
-
What are the general specifications for Full Access Cabinetry?
General Information
Cabinets are available in 0.1mm (.001") increments.
Choose either pre-finished maple UV interior, or unfinished (raw) interior (species available listed below). All supplied parts, including Back panels, are 3/4" thick.
Cabinet box plywood is light color domestic hardwood unless otherwise specified.
Back panel has an optional 10mm (.3937") scribe between the back and the wall (to accommodate Suspension System and allow scribing cabinet to fit wall irregularities).
Shelves are sized 3mm (1/8") less than the total inside width for easy adjustment.
Cabinets with Adjustable Shelves have the side panels bored for 5mm shelf pins on 32mm centers(pins not included), these 5mm shelf holes are in pods of 5 holes.
Cabinet Components are available in the following wood species:
- UV (Clearcoat) Hard Maple
- UV (Clearcoat) Natural Birch
- RAW Alder
- RAW Cherry
- RAW Hard Maple
- RAW Hickory
- RAW Red Oak
- RAW Walnut
- RAW White Oak
- White Melamine
- Fog Gray Melamine
- Hard Rock Maple Melamine
- Select offering of Stevens Wood TFLs with wood grain and solid colors available
- Select offering of Formica Fenix solid color TFLs
*See next subsection in FAQs for general information regarding materials.
Read more -
Disclaimer about Available Materials
*Any images included below, for communication purposes via our customer service team or elsewhere on our website, or in the renderings being presented via our Cabinotch Full Access Cabinets project configurator may differ from the products supplied. Products are produced within the specified color or grain tolerances set by our vendors and, production batches (one order to the next) may differ in tone or pattern; EVEN IF THE SAME MATERIAL SELECTION IS MADE. Please request physical samples prior to ordering TFL materials.
Read more -
Plywood Material Options
Cabinotch sources all of our hardwood plywood domestically through Columbia Forest Products. This material is their Purebond© Hardwood Plywood and is both LEED© and CARB compliant having no added urea formaldehyde (NAUF).
The following are the plywood options for Carcass and Exterior Parts via our Full Access Cabinets portal on our webstore. Note that when specifying these materials in your Project Presets*, we will specify that the material is either RAW 2-Sided or UV Maple 1-Sided:
- UV Hard Maple
- UV Natural Birch
- Alder
- Cherry
- Hard Maple RAW
- Hickory
- Red Oak
- Walnut
- White Oak
Hardwood Plywood Manufacturer, Hardwood Veneer | Columbia Forest Products
Read more -
Melamine Material Options
Cabinotch offers two solid, neutral color melamines as well as one wood grain patterned melamine, produced by Arauco© from their PRISM TFL product offering. All offerings produced with Arauco© Duraflake Particleboard substrate in their “Suede” texture.
- White (W100 White)
- Fog Gray (SF208 Folkstone)
- Hard Rock Maple (WF275)
Read more -
NEW StevensWood Material Options
Cabinotch now carries select Stevens Wood TFLs (Thermally Fused Laminates). Some of these offerings have a look and feel of classic wood grains. This provides rustic styling elements for the modern design of Full Access Cabinets.
The materials below are available when the selection is made for “Cabinotch - StevensWood Doors” under “Door Selection” when creating your project presets. The materials shown to have a woodgrain texture will additionally give you an ability to control the grain direction on Applied End Panels and Slab Doors/Drawer Fronts.:

Black 174 - Ashland Collection - Matte Finish
Bleached Walnut W42 - Timber Collection - Veneer Texture

Dark Walnut W66 - Timber Collection - Veneer Texture

Evergreen Mist 756 - Ashland Collection - Matte Finish

Kyushu L09 - Legno Collection - Tokaj Alder Texture

Morning Fog 596 - Artika & Rain Collection - Artika Texture

Midnight Run L39 - Ashland Collection - Trio Texture

Northsea 008 - Ashland Collection - Matte Finish

Pure White 388 - Ashland Collection - Matte Finish

Straight Noce WC4 - Timber Collection - Veneer Texture

Tsunami 741 - Ashland Collection - Matte Finish
Read more -
NEW Formica Fenix Material Option
Cabinotch now carries a select offering from Formica’s Fenix® NTM line. These products are offered in an extremely matt finish to limit light reflectivity and are soft to the touch. They have anti-fingerprint and can self heal superficial scratches with the application of heat.
These colors are available for doors, drawer fronts, and cabinet carcass components should your Door Selection be for “Cabinotch - Formica Doors”:

0029 Bianco Male

0030 Bianco Alaska

0724 Grigio Bromo

0725 Grigio Efeso

0748 Beige Arizona
>
0754 Blu Fes

0720 Nero Ingo
Read more -
Do you have written instructions on how to install Full Access Cabinetry?
Yes we do, click on the link below to download the instructions, and you can personalize them for your own use as these instructions are in a MS Word format:
Read more -
Why should I use the metric measuring system?
You don't have to use the Metric measurement system instead of Imperial measurement system, but there are some clear advantages.
First and foremost is the fact that there are no fractions, and little or no need for decimals (1 mm is equal to .03937"). Measuring for a plumbing hole in the back of a sink cabinet never requires your employee to know how to find a common denominator, or have the conversions from fractions to decimals memorized, they are working with whole numbers.
Your employees never need to calculate what half of 21-9/16" is, they just need to calculate half of 548.
Simply stated, the Metric measuring system sets your employees up for success, and removes many opportunities for mistakes, and although they may not be familiar with Metric, the learning curve is exponentially shorter (some employees will never know how to find a common denominator, no matter how much time you spend with them).
Read more -
What is the 32mm System?
The short version is that all cabinet heights should be an increment of 32mm (example: 768/32 =24). As long as you can divide your cabinet height (excluding the toe kick height) by 32, and get an even number, you are on system.
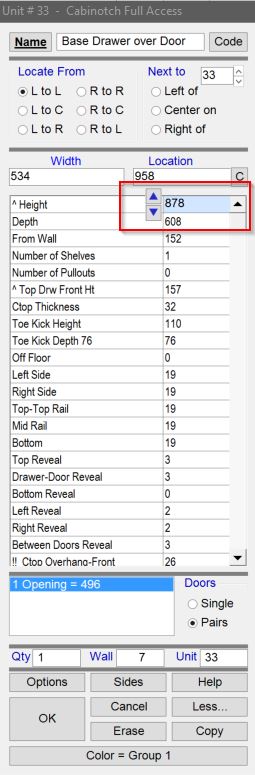
When you use the Cabinotch Full Access Library for KCD, all cabinets will have a default height that is in system. If you use the increment option (up arrow and down arrow) to move your cabinet height up and down in increments of 32mm, you will stay in system, even if you have changed the scale to Inches.
The same logic is built into the door and drawer front heights as well. Doors and drawer fronts should be a divisible of 32 after adding back your chosen reveal (example: 157mm top drawer height plus our 3mm chosen reveal equals 160mm. 160/32=5).
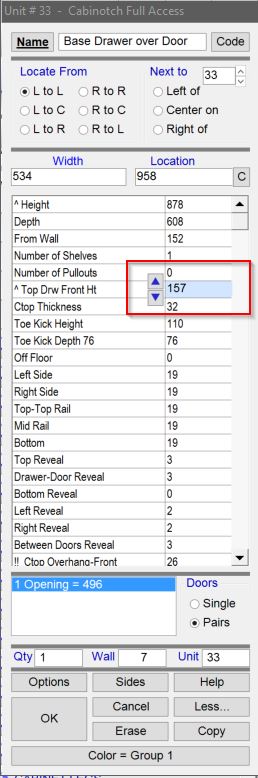
As with the cabinet height, the door and drawer front heights have the increment option (up arrow and down arrow) to move your door and/or drawer front height up and down in increments of 32mm. Again, you will stay in system, even if you have changed the scale to Inches.
Read more -
Why are your Wall Cabinets defaulted at 13" (330mm) deep?
We use a 19mm (3/4") thick back, and hold that back off the wall 10mm (3/8") to leave room for the hanging rail that is part of the suspension system we use to install Cabinotch Full Access wall cabinets (see the Suspension System question for more information), so the cabinet will have 1- 1/8" less interior depth than the total cabinet depth. To make certain the end user will have adequate interior space to store their dishes (over-sized plates have become very common place), we have bumped our default cabinet depth to 330 (13"). You are in full control of the wall cabinet depth, so you can set it to anything you want, but we wanted our default depth to accommodate as many over-sized dishes as possible. Of course there are some that would require a 458mm (18") deep cabinet, but a 330mm (13") depth should accommodate the vast majority of over-sized plates.
Read more -
Why should I try to stay in system?
First, and foremost, you don't have to. The Cabinotch Full Access Library for KCD is fully parametric, so if you go off reservation, I mean system, you will be just fine. All your doors, drawers and shelves will work just fine.
BUT, one of the advantages that is still relevant in the age of CNC machines, is that if you stay on system, all your cabinet end panels, doors and drawers will become recognizable in a very short time.
Looking through a list of cabinet parts, door and drawer front parts will become very familiar, and if something is not right, it will be a great big red flag that you need to look deeper (removes the opportunity for mistake from the process).
If you have a wall of shame (you know, that wall in your shop where all the parts that were miss-cut or miss-ordered sits gathering dust), then you might want to consider, or reconsider using the 32mm system.
Read more -
What are the advantages and disadvantages of Applied Ends versus Integral Finished Ends
- On cost sensitive projects that are very simple, Integral Finished Ends can save the cabinetmaker some material cost.
- Applied Ends allow them to stack cabinets (you can't stack if you use the integral finished end option). Stacking allows you to exceed our 96" height limitation.
- With Applied Ends, all cabinet parts are ready to build when the order is received (integral finished ends would have to be identified, separated to go through the prep and finish process, and those cabinets could not be built until those parts were sanded, finished and allowed to dry).
- Integral Finished Ends will require the cabinetmaker to tape off the UV portion of the part so it does not get over-spray on it during the finish process.
- When using the combination of Applied Raised Panel Ends on fully exposed ends, and integral finished ends on finished ends where the end engages another cabinet, and can't be raised panel, this combination gives an unbalanced appearance (i.e., and tall oven cabinet with an applied raised panel end on one side, and an integral finished end on the other where it engages base and/or wall cabinets).
- When using applied ends exclusively, the cabinetmaker has the option to install a project without the applied ends (in the case of a highly time sensitive project), adding spacer blocks while installing, and to come back later with the applied ends.
- Applied Ends on wall cabinets allow the cabinetmaker to run the applied end long (add the height of their light rail to the cabinet height) so the light rail is always straight cuts. Otherwise, they have to order more light rail, and cut two miter's for every return.
- Applied End panels, when extended past the cabinet depth by the thickness of the cabinet doors provides an inset appearance.
- Integral End Panels can't be an exclusive option, you have to use applied ends where you have an enclosed refrigerator, or need panelized (raised or inset) ends.
Read more -
* How does the Full Access Oven Cabinet work?
It's really not all that complicated, but it does take more than a sentence or two to cover all the intricacies of a cabinet with one to multiple appliance openings that need to be defined by the user, and making sure you have a landing zone above and below those appliances. To learn how this cabinet works, and the controls you have in KCD, read our Blog post on the Full Access Oven Cabinet.
Read more -
* How does the Full Access Blind Corner Cabinet work?
It's really not all that complicated, but it does take more than a sentence or two to cover all the intricacies of a cabinet that half or more of the cabinet has a panel mounted to the face, and has a drawer partition that needs to be installed correctly. So to provide you with a more in-depth look at this cabinet, take a look at our Blog post on the Full Access Blind Cabinet.
Read more -
* How does the Full Access Angled Cabinet work?
This cabinet is actually pretty simple as it only has four essential components, a Side, Back, Top and Bottom with optional Adjustable shelves. The side is the depth of the cabinet, and the back is identical to a side except that is it 19mm (3/4") narrower to but into the cabinet Side.
If you need doors on this cabinet, you will need to use the negative angle hinges listed in the "What Hinge and Hinge Plate should I use?" question of the Functional Hardware group on this page.
Here is a quick animation that hopefully will make this cabinets construction and assembly a little clearer.
Read more -
* How does the Full Access Clipped Cabinet work?
This cabinet is a little more complicated than most, but only has five essential components, a Deep Side, Short Side, Back, Top and Bottom with optional Adjustable Shelves. In the webstore, you have control over the Width and Depth, but the Short Side Depth is a calculated field to make sure the clip is always a 45 degree angle. You will also need to define if this cabinet is a Left or a Right Clipped cabinet.
Just make sure your combination if Width and Depth provide at least a 152mm (6") Short Side Depth, or you may not have any adjustable shelf holes on the Short Side.
If you need a door on this cabinet, you will need to use a negative angle hinge if you are hinging the door on the Deep Side Panel, and the diagonal hinge and plate if you are hinging the door on the Short Side, both hinge options are listed in the "What Hinge and Hinge Plate should I use?" question of the Functional Hardware group on this page.
Here is a quick animation that hopefully will make this cabinets construction and assembly a little clearer.
Read more -
Do you have Face Frame cabinets?
Yes we do!
Check out our FAQ-Face Frame Cabinetry page to learn about Face Frame cabinets. Available now through our Store website, or through our Cabinotch KCD Design Library.
Read more -
How to Order
After logging into your account and finding the “Face Frame Cabinets” button from the website directory (left hand side of your browser), you will be directed to the “Project Selection Screen”
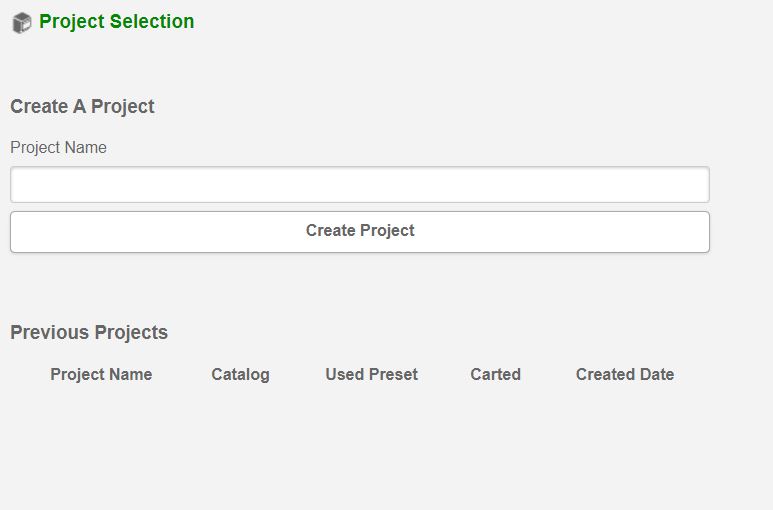
Here is where you will both generate new bids/quotes and find any previously “Carted” (finalized) projects as well as any projects which you have saved and needed to return to later to complete.
Upon creating a project, you will first be required to define “Presets” for that project…See Below
Read more -
Item Selection and Building a Project
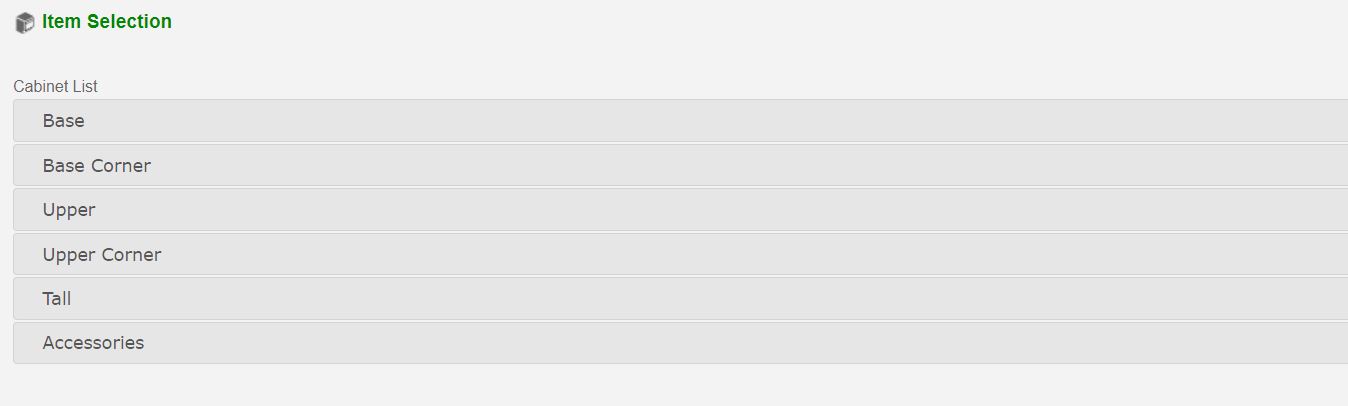
After defining a set of preset options or selecting from a previously generated preset you will then populate cabinets into you project one at a time. The next screen you come to will be the Item Selection screen where you will be presented with our current catalog. By selecting from the Cabinet List, you will find a multitude of categories which are expandable, under each category you will find cabinets in various configurations.
By selecting any cabinet, you will then configure that item, setting all parameters for that unit and applying a “Customer Reference” or Cabinet Number (which will be present on labeled parts). On this page you will see a live 3D rendering of the cabinet which will changed to reflect the options or dimensions being selected, as well as you will see a calculated price for that cabinet box (excludes drawers and hardware).
You will then be taken to your Project Review.
Here you will see the list of items currently in your project, from here you may “Add Custom Item” to return to the cabinet catalog or you may Edit, Duplicate, or Remove any cabinet from this page.
Read more -
Ordering your Project
Once your project is completed, you will then “Add To Cart” from the Project Review page. *Note that this will finalize this project and you will no longer be able to edit the units populated into it.
Post “Add To Cart”, this project will be loaded to your Shopping Cart. Here you will see a break down of pricing for the items which Cabinotch will provide, I.E., Custom Cabinets, Dovetailed Drawers, Undermount Drawer Slides, and Hinge hardware. There will also be several reports on this page for your own reference.
You may now save this Shopping Cart or Proceed to Checkout.
Read more -
What are Presets?
The presets are your default's or as some call the shop standards for your job. Any selection you make in the presets, will automatically be set on the cabinet as you add them to your project. You do have the ability to override any of your selected presets on a per cabinet level. You do this by expanding the "Applied Preset" option at the bottom of the dialog box.
Read more -
How do I "Manage Presets"?
As of our Version 3.0 Release (January of 2023) we have added the ability to “Manage Presets”, this give you new power to delete or modify Presets which you have previously created as well as the ability to switch to a new Active Preset when viewing the “Item Selection”(Catalog) page. In addition to this, you will note that on the page, “Project Overview”, you will see which preset was active and applied to each item added.Read more
-
Door / Fronts Type Selection
Cabinotch is now offering Slab doors produced in 20 NEW TFL offerings. The options here will unlock door and cabinet materials from either StevensWood, Formica, or what we are calling our “Economy” offering which includes the available Melamine materials which have been historically available exclusively for the Cabinet Carcass. Cabinotch will highly recommend that you first request samples of these materials prior to purchasing cabinet components and doors. Please see under “General Information about Available Materials”, details concerning these new offerings as well as the disclaimer which leads off that section.
Read more -
Door / Fronts Style
The options being presented here will be based upon the selection made under Door / Front Type.
Read more -
Door / Fronts Edgeband
The available option set will coincide with the selection made under ‘Door / Fronts Type Selection’. While you can make a selection to “Match Door/Fronts Material”, you may also choose to make a selection which will create some contrast.
Read more -
Door / Fronts Grain Direction
Door / Fronts Grain Direction If you select a “Door / Fronts Material” which is a texture (has a wood grain pattern), exclusive to our StevensWood options, you will be presented with a selection for either Vertical(Standard) or Horizontal grain. The Grain Direction will be represented on the 3D model with arrows which run in the direction of the grain.Read more
-
Carcass Material
This selection will determine the material schedule for all parts associated with the cabinet case. This selection does not drive the species selection for Finished or Applied Ends.
Read more -
Construction Method
This selection references the connectors and machining to be utilized in cabinet assembly. All cabinets will come preloaded with your selected connector. Most of our customers opt for the ‘Lamello Tenso with 3mm Pilot Holes’ construction. *Note that we do not advise you select the more traditional wood dowel options unless you are equipped with a case clamp.
Read more -
Front Carcass Edgeband Selection
This selection defines the edgebanding that will be on the front/face of the Carcass parts. We stock Rehau’s “Top 50” selling PVC edgeband as well as hardwood veneers which match all the stocked plywood species.
Read more -
Shelf Edgeband Selection
This Selection will dictate what edgeband will be used on forward facing edge of adjustable shelving. Many of our customers choose to match the box's interior, while some choose to match the face to avoid a different edgeband color being visible between the pair gap of the doors.
Read more -
Exterior Parts Material
Material selection for forward facing cabinet components which are integrated into specific cabinet models available. For example, a “Dummy” spanner on a base cabinet with full height doors or a “Blind End Panel” on Blind Corner Cabinets. This material selection also applies to “rail” components, i.e., “Rails” on Oven Cabinets or Included “Rail” when making a selection for bottom recess height with rail. This is to include Applied Ends if added to the model.Read more
-
Sides Material (Finished Ends Only)
This is the selection for the material type when you are specifying “Integrated” Side Panels using the Side Type selection. These cabinet sides will have No Pilot Holes if a construction method was previously selected which indicates pilot holes are included. These materials read as “[Exterior Species] – [Interior Species]”.
Do note that it would be possible to have previously selected a Carcass Material as [Melamine – White-2 Sided] and then have a “Side Material” selection which will yield a Raw or UV plywood component. This will be visible when viewing the live render of each cabinet unit, as represented in the color of cabinet components.
Read more -
Top Drawer Front Height
Important to note that in the realm of Full-Access/Frameless cabinets, opening sizes are often defined by parameters given for door or drawer front heights. For an example, upon selecting a “Base 3 Drawer” unit we will require that you specify for us a top-drawer front height so that we might automatically calculate the remaining drawer openings. It is also important to note that once a project through Cabinotch’s Full Access portal is “Carted” to your account we will give you a Door and Drawer front list (non-included parts) which have sizes which are calculated based upon the responses you give for this option as well as all options pertaining to “Reveals”.
Read more -
Drawer Box Selection
Dictates what Cabinotch is to include regarding drawer boxes.
Read more -
Drawer Box Material
Cabinotch currently has two species selections for side material in our dove-tailed drawers. If the “Drawer Box Selection” was set to “Dovetail-Undermount” then drawer boxes will be supplied in the material selected under this option.
Read more -
Adjustable Shelf Holes
Cabinotch will drill holes relative to the location of adjustable shelves drawn into each unit. Select the option that will provide holes as you see fit. You will note that the rendering of each cabinet will show holes per your selection.
Read more -
Toe Selection
This selection will dictate how and what Cabinotch will machine for regarding Toe-Kicks on base and tall cabinets.
Read more -
Toe Kick Height
This is a variable range. Note that Cabinotch requires you to indicate both “Cabinet Side Height” as well as “Toe-Kick Height” with each applicable cabinet. We then calculate the total cabinet height. *Note that should you select an option for Toe-Kick which includes a leg leveling system that you can make a selection for Toe-Kick Height which will not accommodate the adjustment range of those legs. They max out at a 5” height.
Read more -
Toe Kick Depth
This is a variable range. This will dictate the location of the exposed face on included toe-kick.Read more
-
Edgeband Top/Btm of Sides
A yes or no response is required. If yes, this edge band will match the selection made for the front edge of cabinet case.Read more
-
Hinge Placement
This selection dictates the location of drilling for hinge plates on cabinet sides. The measurement is pulled from top and bottom of door to center of hinge plate drilling. *Note that reveals are used to calculate this location.
Read more -
Mid Stretcher Position
We give you the option to off offset (push the mid-rail down) so all but the reveal (typically 3mm or 1/8") is available for doors below to land on, making the bumper pad position on the doors below less critical.
This offset looks something like this (the left image is with line to 8mm (.315"), the right image is with the option set to centered):
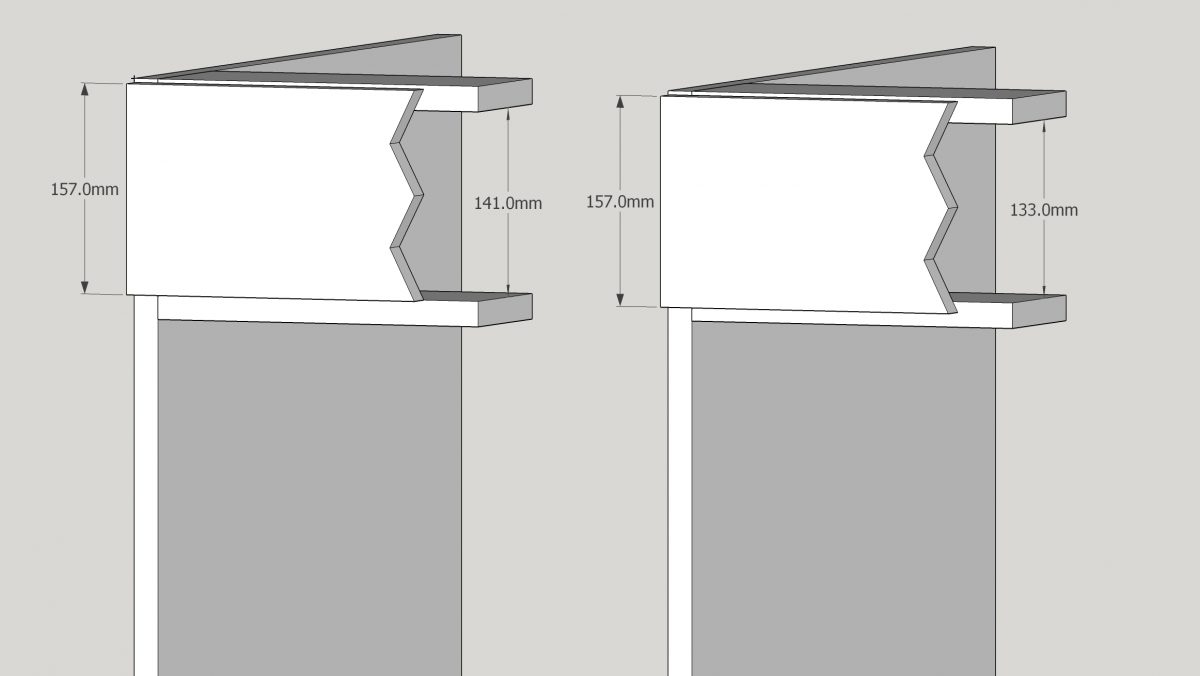
If you prefer this mid-rail be centered as shown in the image to the right, then simply set line 69 to 0mm (0"), and it will stay that way until you change it (KCD updates will not affect settings you change).
Read more -
Reveals
Reveals – Top (Base) - Top base cabinet reveals
Reveals – Top (Tall & Upper) - Top tall and upper cabinet reveals
Reveals – Bottom (Base & Tall) - Bottom base and tall cabinet reveals
Reveals – Bottom (Upper) - Bottom upper cabinet reveals
Side Reveal - *A selection for .0625 (1/16”) would therefore give an .125”(1/8”) reveal between doors when locating cabinets side by side.
Reveal Between – Reveal on horizontal components IE fixed shelving and stretchers.
Read more -
Bottom Recess Selections
Bottom Recess Selection (Uppers Only) – Normally, Cabinotch produces square boxes. The option here “YES” will change the location of Upper Cabinet bottoms in relation to the cabinet sides. This moves the bottom up in space, thus creating a bottom recess. Important to note that “Rails” included under this option will be the material set for “Exterior Parts” previously and therefore will be edgebanded to match that species selection and not necessarily match the “Carcass” material.
Bottom Recess Height- This only will be applied if a cabinet has a Bottom Recess with or without Rails.
Read more -
What edges do you edgeband?
Actually, it's totally up to you. We will edgeband the front edge of all cabinet parts, and you choose whether or not we edgeband the tops and bottoms of your cabinets.
We provide three questions for edgebanding:
Edgeband for Front Edge of Cabinets
Edgeband for Adjustable Shelves
Edgeband for Tops and Bottoms of Sides
These questions allow you to tell us you don't want us to edgeband these edges at all, or choose the color or specie of edgeband you want us to use in each location, or to let us know that you will provide the edgeband for us to use (when you need a color we do not show in our list).
Read more -
What edgeband options do you offer?
We offer Rehau PVC edgeband in their 50 most popular colors and raw veneer edgeband in the following species:
- Alder
- Cherry
- Hard Maple
- Hickory
- Red Oak
- White Oak
- Walnut
We also offer a pre-finished Hard Maple edgeband option.
If none of these meets your requirements, you have several other options. If you have your own edgebander, you can choose "None", and we will not edgeband your parts, allowing you to edgeband them with what you want, and where you want.
Another item in our list that may be helpful is our "Customer Supplied" option. If we don't have a color or type of banding that meets your requirements, then you can source the edgeband yourself and have it shipped to our plant. We will hold your job in Order status until we have received the edgebanding at our plant, then release it to the floor once the edgebanding arrives, and edgeband your parts with the edgebanding you supplied. We will then include the balance of supplied edgebanding with your shipment.
Read more -
What edgeband color matches your melamines?
White Melamine - C100007 Designer White.
Fog Gray Melamine - C600257 Fog
Hard Rock Maple Melamine - CP20332 Hardrock Maple
Read more -
How big is the pallet my parts will be shipped on?
There are three pallet sizes, one is 31" x 63", another is 46.5" x 98" and the last size is 35.5" x 95". If you have tall cabinets like a pantry, linen, or tall slab end panels, or asked us to provide your toe kick material or tall fillers for Full Access cabinetry, then we will use either the 46.5" x 98" or 34.5" x 95" pallet.
If you do not have a fork truck with long forks or fork extenders, then you might want to consider having your pallet delivered to your local FedEx terminal, and picking it up there (they will set the pallet on your trailer, or into your truck bed for you).
Read more -
* What is the best way to check-in my Cabinotch Component parts?
Ideally, you will unpack and check-in all your components as soon as they arrive to make sure nothing is damaged or missing. By doing this, you provide time to get replacements for damaged or missing parts before you are in desperate need of them.
The clear down-side to this process is the parts might be in your way if you go through this process and just stack them against a wall, so we suggest you either make or purchase carts to store your parts in that are mobile so you can move them around to get them or keep them out of your way until they are needed. Typically these carts full of parts will take up no more room than our pallet/box, so there is really no downside if you invest in the carts.
The up-side is you are not just checking the parts in, you are sorting them, and ideally you will sort them by cabinet number which will make assembly much easier and far quicker. Take a look at our Blog post on Sorting Your Cabinotch Components for a more in-depth look at this process.
Read more -
How does your standard base cabinet end panel layout?
Click on images to enlarge
 Read more
 -
* Which Lamello P-14 Fastener goes where?
We have found that if you put the female in the shouldered Lamello slot of your vertical parts, and the male in the shouldered Lamello slot of your horizontal parts, they do seem to go together easier.
You also want to make sure that both the male and female Lamello's are not in the slot uneven (make sure they are pushed in far enough that the face of the Lamello is on the same plane as the face or edge of your part, centered and level). If the female is in crooked, when you go to push the parts together, it will slide even more in the direction that it was out, and it will become impossible to snap the connectors together.
If you accidentally do put a Lamello in incorrectly, and you can't snap it together, if you have put a significant amount of force trying to push it together, it is best to disassemble, and then replace the male part (it is almost impossible to damage the female part, but the tines of the male part are fairly easy to damage).
UPDATE: We now insert the Lamello fasteners for you. When you receive your Cabinotch Full Access project, all fasteners will be pre-installed.
You also might find our Blog post on Full Access Assembly useful.
Read more -
Do I need to glue the joints when assembling these Full Access Cabinets?
Yes and No, depending on if you choose to use Integral Finished Ends or Applied Finished Ends. If you choose to use Integral Finished Ends, you will need to use a PUR glue (i.e., Gorilla or Titebond PUR) in each female Lamello clip. PUR glue is the best choice, and the glue joints it produces far exceed all KCMA specifications.
Your objective is to glue the fastener (I like to glue the vertical part, letting glue run down into the female Lamello fastener), so that once the glue dries, the glue fills all the space behind the tines, keeping the fastener from being able to come back apart.
If you want to run a small bead the entire length of the joint for good measure, keep the bead as thin and tight as you can as PUR glues foam, and tend to ooze out if you use too much.
If you choose to use Applied Finished Ends, the you will find all of your unfinished ends will have 3mm pilot holes so you can screw your cabinets together. If you choose this route, you do not need to glue your cabinets together. Even if you do choose to use Integral Finished Ends, you can skip gluing all of your unfinished ends as you can screw them together.
Read more -
What screws should I use to assemble my cabinets?
The Hafele 010.72.950 screw is the best I have used. This is a #6 X 1-3/4" screw with countersinking nibs on head, self-cutting tip, is available with Square or Phillips drive and in a Black Oxide or Zink-plated finish.
A #6 screw is a better choice than a #7 or #8. Both will telegraph the screw thickness on particle core material on occasion, and there is always the potential of knifing open of a panel when using a larger shank screw.
Read more -
Are there any specialty tools I will need to assemble my Cabinotch Full Access Cabinetry?
Yes, a dead blow mallet is an essential tool for assembling Full Access cabinetry. You will need it to: Tap the cabinet parts into alignment (the Lamello fastener has about 2mm of lateral adjustment). Knock the leg leveler sockets into the bottoms of your base and tall cabinet bottoms. Drive the suspension blocks into the two 10mm holes.
Read more -
* What is the best assembly sequence for Cabinotch Full Access Cabinetry?
The best way to assemble most cabinets is to lay one of the two side panels down flat on a level table, then snap all the horizontal parts into the side panel (they will be horizontal once you stand the cabinet up into it's upright and normal position).
Next, lay the second side panel on top of the horizontal parts, and align all the fittings, then you can gently tap them with your fist or the dead blow mallet (don't try to force them).
Then use the dead blow mallet to lightly tap all your parts into alignment (the Lamello clips allow approximately 3mm (1/8") of lateral adjustment).
For a step by step look at the assembly process with images, take a look at our Blog post on Full Access Assembly.
Read more -
Why are there 15mm holes in the bottom of my Base Diagonal and Piecut Corner Cabinets?
Another great question. Several reasons create the need to have these holes in the bottoms of your specialty corner cabinets. From our perspective (manufacturing), we can only machine one side of a part, and this particular part needs to be machined on two sides if you choose to utilize leg levelers (the leg levelers require a 15mm hole to attach the legs, but we also have to groove the other side of the part for the backs).
To solve the need to machine on both side in the absence of the ability to do so, we choose to through bore the leg leveler holes (so we machine the interior face, but through bore the leg leveler holes so they can be used from the exterior face).
From the users perspective, it is very difficult to reach the back leg(s) of either of these specialty cabinets, and by through boring these holes, you can adjust this hard to reach leg or legs from inside the cabinet (just stick a long Philips head screwdriver down through the hole, and you will find a star shaped bottom of the foot that will allow you to adjust using the screwdriver).
Once you are done leveling your cabinet, you can use an 18mm peel and stick FastCap to cover these holes.
Read more -
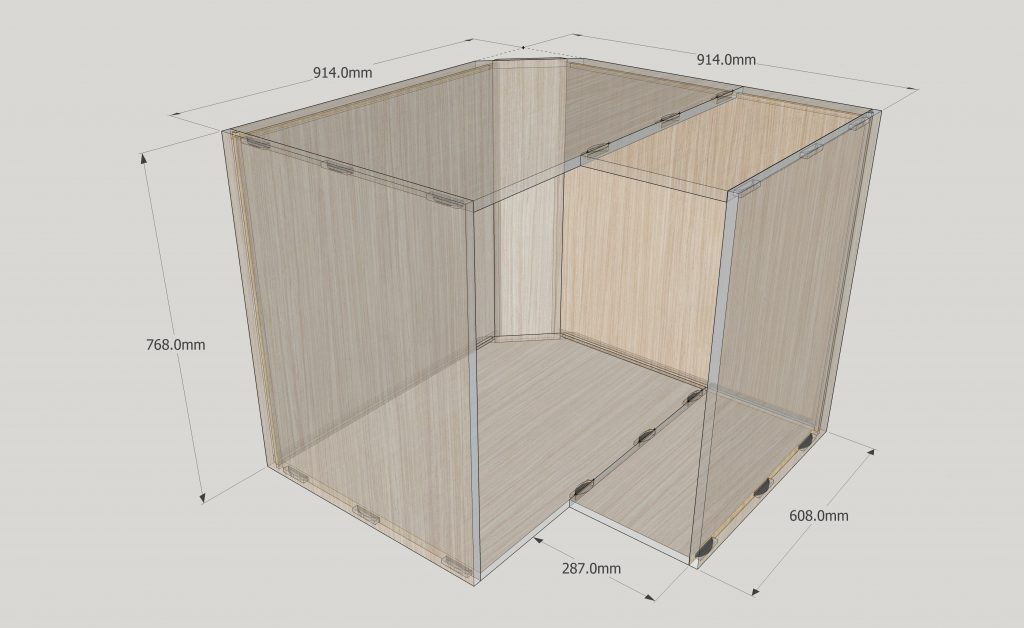
How do I assemble my Base Piecut Corner Cabinets?
For the most part, assembling a Cabinotch Base Piecut Corner cabinet is just like assembling any other Cabinotch Full Access Base Cabinet, with the exception that this cabinet has a two piece top and bottom.
The reason we choose to do this is it allows the tops and bottoms to be edgebanded on our automatic edgebander, providing a much better looking glue line, and superior glue adhesion. The L-Shape front notch of a one-piece unit requires hand edgebanding.
First, this is what you are attempting to assemble.
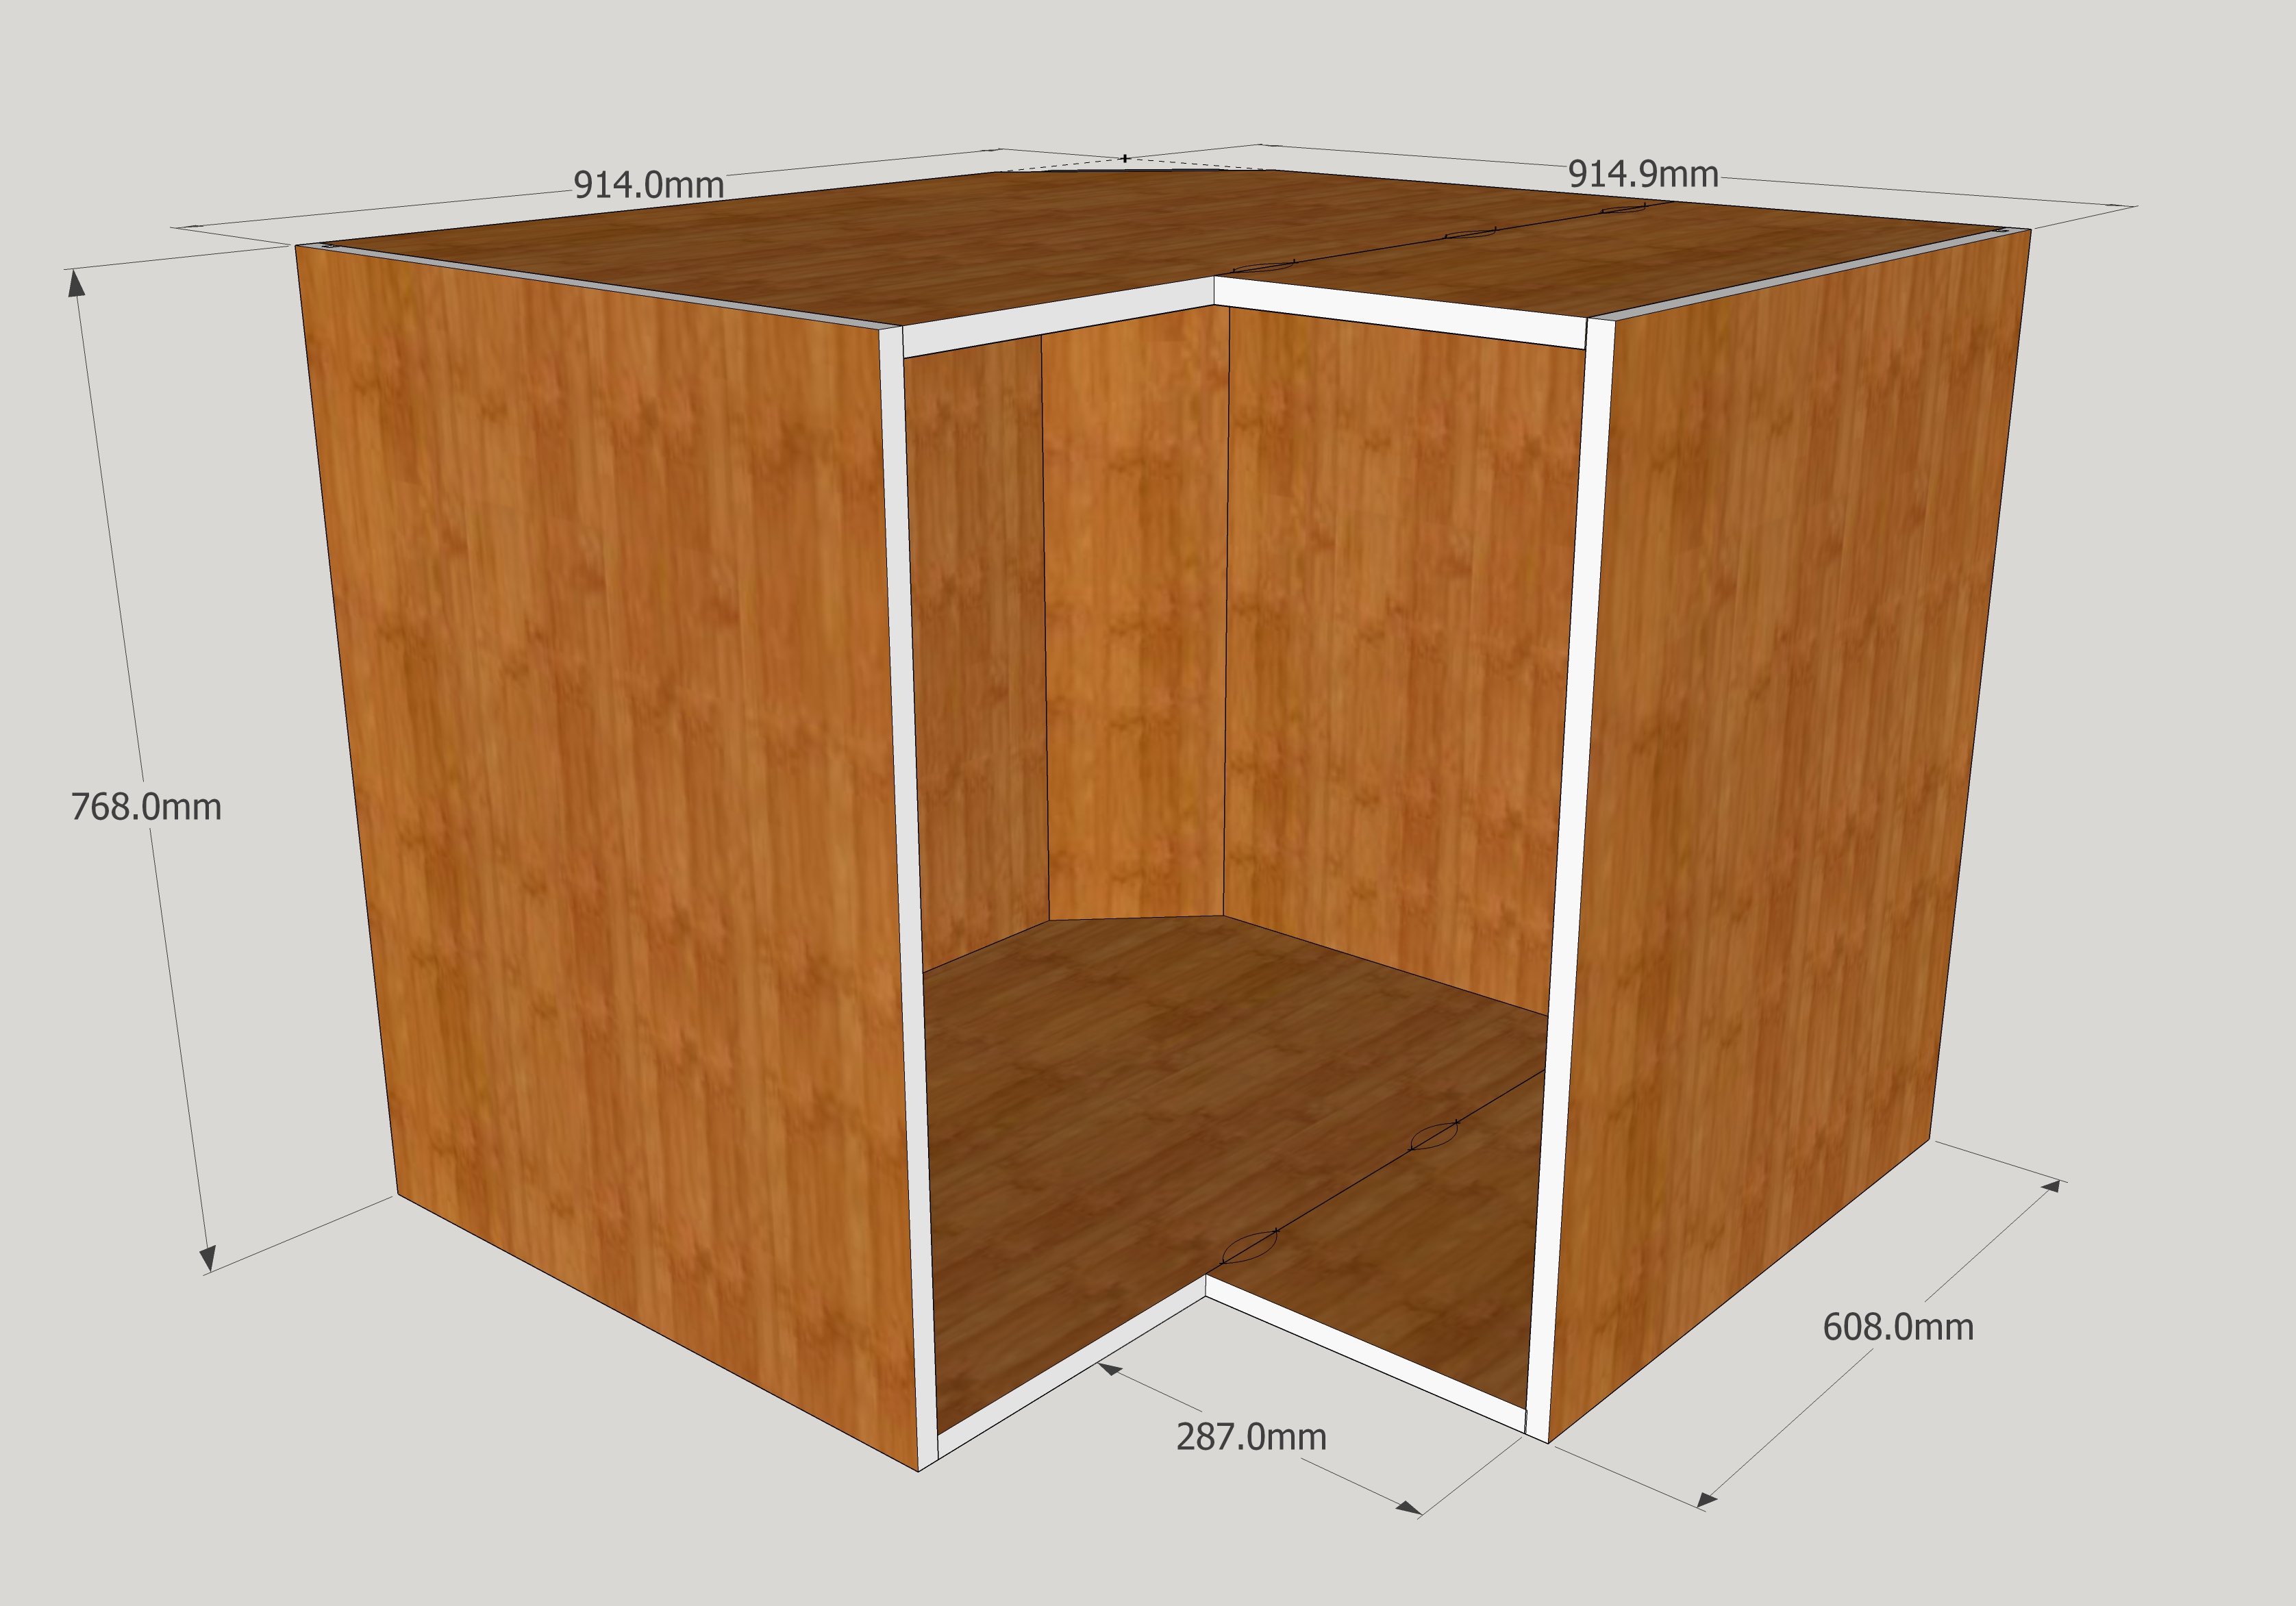
There are two pieces that make the top and two pieces that make the bottom, and they are put together by adding a PUR glue to the female Lamello, and then snapping the two parts together.
For the cabinet itself, it should not be a problem to go ahead and assemble the cabinet even though this glue is not dry, but once you are done assembling the cabinet, you should let the glue set for a couple hours before stressing the joint you added glue to.
To help you with orienting the parts, the following image should provide you with the layout, and how all the parts go together.
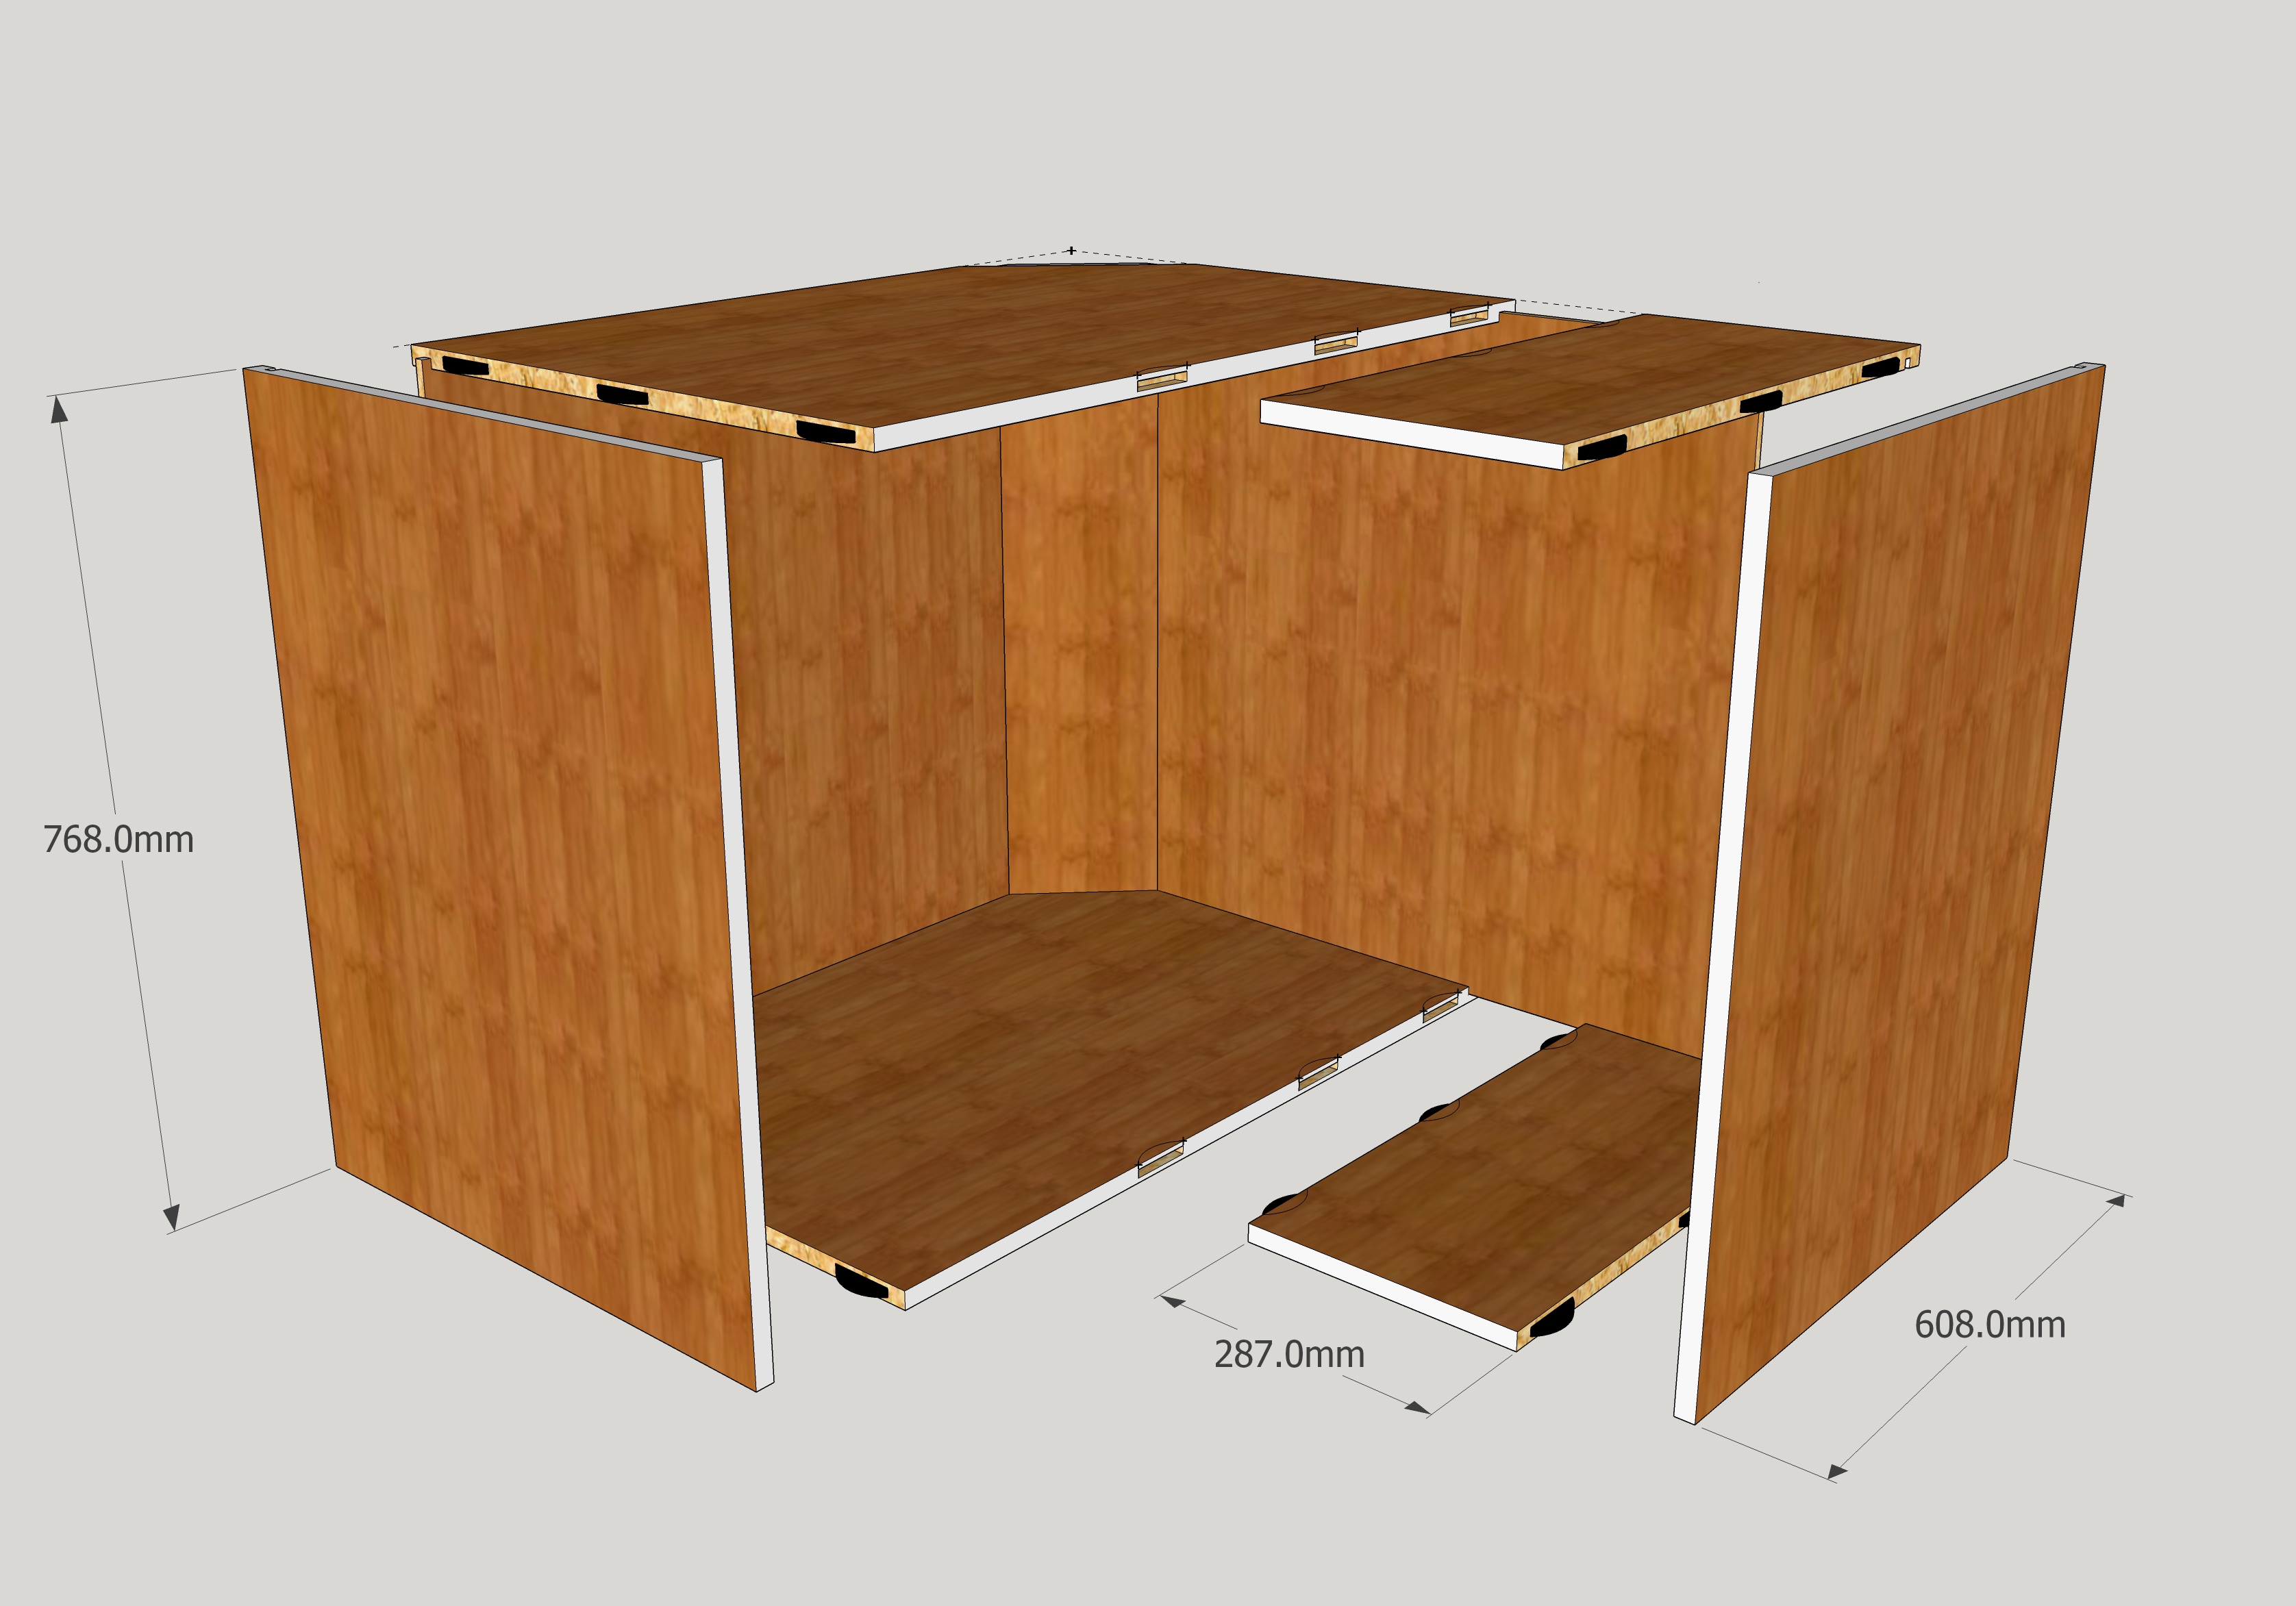
More often than not, these cabinets end up with Lazy Susan units installed in them, but if you choose to have adjustable shelves, you will need to glue the joint between the two parts that make up the L-Shaped adjustable shelf with PUR glue, and let the glue setup completely before installing the adjustable shelves in the cabinet.
Here is another view that might help. The X-Ray view lets you see through the parts so you can see the machining.
 Read more
 -
Why is there a 10mm (approximately 3/8") space behind my Full Access cabinet backs?
Two reasons. First, to accommodate the hanging rail for the Camar Suspensions System, but even if you choose not to utilize the Suspension System, you will still have this 10mm space we like to refer to as Back Scribe.
From the name, you have probably already guessed the second reason for the 10mm space behind the back. Building are almost always framed with wood, and walls made from wooden studs are not only seldom plumb, they are seldom straight (they have humps and bows in them).
The 10mm Back Scribe gives you some breathing room to scribe cabinets to bad walls when needed. And on occasion, you will find it useful for the plumbers loop de loop trick to not run drain pipes through the bottom plate of a wall, this extra 10mm of space might be just enough to keep you from butchering another of your awesome cabinets.
Read more -
Why should I use Leg Levelers?
Leg levelers greatest attribute is that you can get your Full Access cabinetry perfectly level, regardless of the floor and wall conditions (with Full Access cabinetry, it is imperative that your cabinets are level and plumb if you want your doors to operate and look proper, 3mm or 1/8" reveals are very unforgiving).
Another attribute that most appreciate is that the cabinets are fully supported on all four corners, not just at the front where they might be shimmed, and then dependent on the shear strength of the screws at the back. In the age of stone counter-tops, which are extraordinarily heavy, this is more important than it was even a few years ago.
While we are on the topic of heavy stone counter-tops, it's nice to know that the sockets that receive the legs are actually partially under the end panels, transferring the weight of the counter-tops to the floor rather then the cabinets joints.
Perhaps the greatest attribute of all is that if there is a water incident in the room where the cabinets are installed (pretty common in kitchens and baths), even if it is only a minor incident like a leaking ice maker, faucet or dishwasher, the cabinets will not be damaged. Only the toe kick will get wet, and it can either be removed to dry, or easily replaced.
Many people appreciate that the toe kick can be removed if there is ever a need to access the space under the cabinets. To have the ability to add or reroute plumbing pipes or electrical wires, or get at heat and air ducting can be a very useful thing, not to mention you just might want your bug man to be able to get at that space when you have the inevitable rodent issue.
From the manufacturing perspective, leg levelers allow us to get 6 base end panels out of a single sheet, where full height toe notched ends only yield 4 base end panels. This extra material yield translates to lower material cost, and thus lower cabinet cost than it would be otherwise.
Read more -
Why should I use the Suspension System for my Upper Cabinets?
Like Leg Levelers, the Suspension System, which consists of steel rail you mount on the wall and suspension blocks that install in the upper corners of the wall cabinets, you can get your wall cabinets perfectly level and plumb. Again, 3mm or 1/8" reveals between doors and drawer fronts are very unforgiving.
One frequently overlooked feature of the Suspension System is that it allows for a single man installation crew (the modular nature of Full Access cabinetry allows for a single man delivery if you ever get tired of paying people to look at the back of a windshield on the way to and from the job-site each day).
The Suspension Blocks have two screws in the face of the block, the upper screw allows you to raise and lower the cabinet, the lower screw allows you to plumb the cabinet. Once you have the cabinets level and plumb, you simply slide covers over the block, making it aesthetically appealing (if the house settles over time, the Suspension Blocks allow the cabinets to be tweaked to accommodate for the settling).
Read more -
Where do I locate the Suspension Rail on the wall for my Upper Cabinets?
It's best to first find the highest point of the floor in the room, then measure up to the top of your upper cabinetry and make a mark if you will be using a laser to install, or draw a level line where ever upper cabinets will be installed.
To locate the center line of the suspension rail, simply measure down 56mm (2 1/4") from the upper line you just marked and make a second mark if you will be using a laser to install, or draw a second level line where ever upper cabinets will be installed.
Tip: The Stabila brand of levels just happens to be 56mm wide/tall, so if you use that brand of level, or you find your favorite brand just happens to be 56mm wide/tall, then you can position to trace the top line where the top of your upper cabinets will be at the top of your level, and the bottom line at the bottom of your level.
Cut your suspension rail to length to fit where ever upper cabinets will be installed, making any joints fall on a stud.
Center the screw holes of the suspension rail on this second line and screw the rail at each stud (you can shim the rail if the wall has bows in it). Attaching the end of the rail with toggle bolts if there is no stud in that location.
Read more -
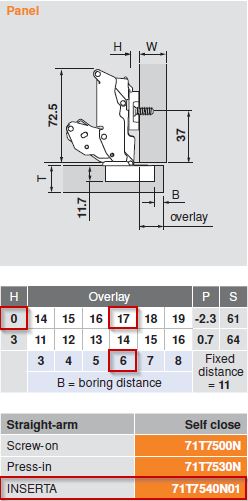
Where do I bore my Hinge Holes in my Doors?
The hinge holes should be bored an equal distance from each end of your doors. Bore a hinge cup hole (size and depth determined by your brand and model of hinge, typically these holes are 35mm in diameter, and 13mm deep) at the location you chose while making your 'Request a Quote' selections in KCD.
- If you answered the Door Hinge Location question with 3.75 - 94.5mm, then bore your doors at 94.5mm (3-3/4") from each end of the door.
- If you answered the Door Hinge Location question with 3, then bore your doors at 76mm (3") from each end of the door.
- If you answered the Door Hinge Location question with 4, then bore your doors at 102mm (4") from each end of the door.
Read more -
Do I have to use any particular brand of Hinge?
Euro hinges are pretty universal when it comes to the standard hinge application (standard hinge plates are 37mm from the face of the cabinet to the center of the 5mm holes), but when you get into specialty cabinets like the Blind Corner Cabinet, Pie-cut Corner Cabinet, Diagonal Corner Cabinet, Angled Cabinet and Clipped Cabinet, you will need special application hinges, and for these specialty hinges there are no universal locations for the two 5mm hinge plate holes. In an attempt to keep our options to a bare minimum, we have chosen to make all the machining for these special application hinge plates align with the Blum brand of hinge. If you have any trouble sourcing them, you can actually purchase them from us during the check out process.
Read more -
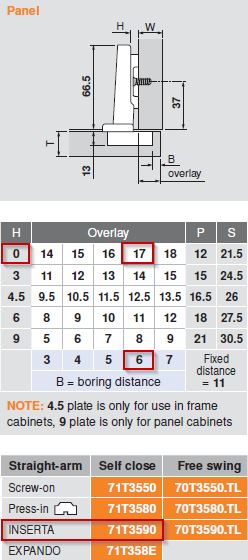
What Hinge and Hinge Plate should I use?
Good question, and I have a simple, but long answer for you.
Since we can't accommodate for all the various brands and models, we had to settle on a single brand (Blum), and you should be able to use any of the various models for each application I will describe below.
For Typical Doors on a Typical Cabinet, we are boring the two 5mm hinge plate holes 37mm back from the front edge of the cabinet, so you could potentially use any brand and model you want (every Euro hinge manufacturer has a hinge for this application, and the 37mm setback is universal).
Since we have chosen the Blum brand, then we recommend the 71B3590 110 degree INSERTA hinge with the 174H7100E 0mm EXPANDO plate.
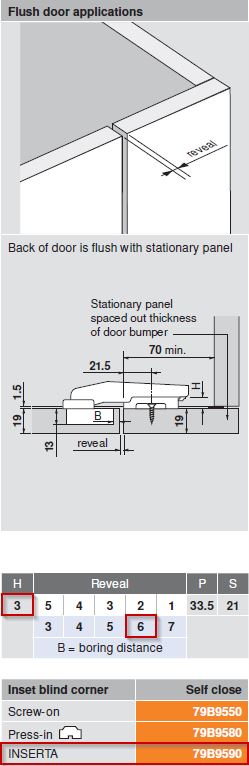
For Blind Corner Cabinets, we recommend the 79B9590 inset blind INSERTA hinge with the 174H7130E 3mm EXPANDO plate.
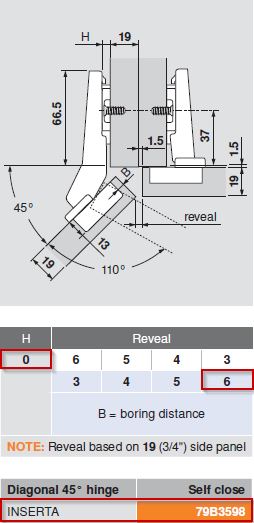
For Diagonal Corner Cabinets, we recommend the 79B3598 45 degree INSERTA hinge with the 174H7100E 0mm EXPANDO plate. Be sure to review your reveals on your Diagonal Corner Cabinets before ordering your doors. If you have any questions, please reach out to Customer Service.

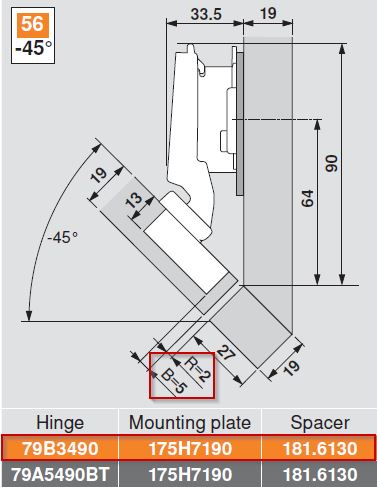
For Angled Cabinets (this is the cabinet that is shaped like a Triangle), we recommend the 79B3490 negative angle INSERTA hinge with the 175H7190 9mm EXPANDO plate and the 181.6130 Spacer.
<
For Clipped Cabinets that are hinged on the short/shallow side, we recommend the 79B3598 45 degree INSERTA hinge with the 174H7100E 0mm EXPANDO plate (same hinge and plate used on a Diagonal Corner Cabinet).
For Clipped Cabinets that are hinged on the long/deep side, we recommend the 79B3490 negative angle INSERTA hinge with the 175H7190 9mm EXPANDO plate and the 181.6130 Spacer (same hinge and plate used on Angled Cabinets).
For a Piecut Corner Cabinet, we recommend the 71T7540N01 155 degree INSERTA hinge with the 174H7100E 0mm EXPANDO plate.
For attaching the two Piecut Corner Cabinet doors together, we recommend the 79T8530.10 Bi-fold PRESS-IN hinge with the 174H7100E 0mm EXPANDO plate for Flat Panel Doors or the 175H6000 frame adapter plate for 5 piece doors.
Read more -
How many Hinge Plates will you machine for?
- We will machine for 2 hinge plates if your door is between 223.8mm (8-13/16") and 1066.8mm (42")
- We will machine for 3 hinge plates if your door is between 1066.9mm (42-1/64") and 1828.8mm (72")
- We will machine for 4 hinge plates if your door is between 1828.9mm (72-1/64") and 2438.4mm (96")
Read more -
What are my Drawer Guide options?
Currently we only machine for Blum Undermount Drawer Guides. Blum Drawer Guide Specifications PDF
Read more -
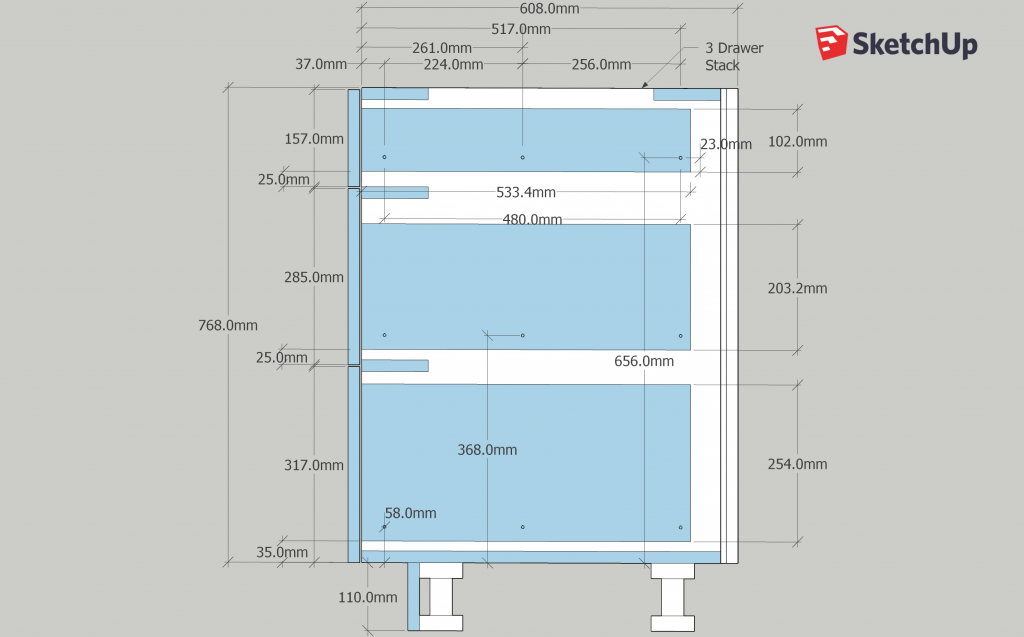
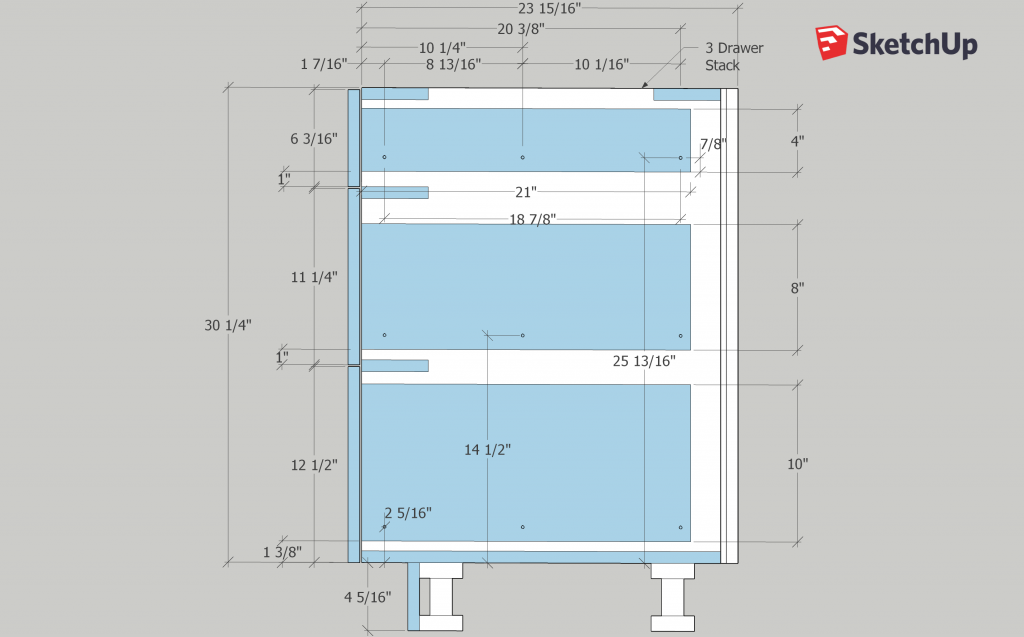
Where are the Drawer Guide holes located?
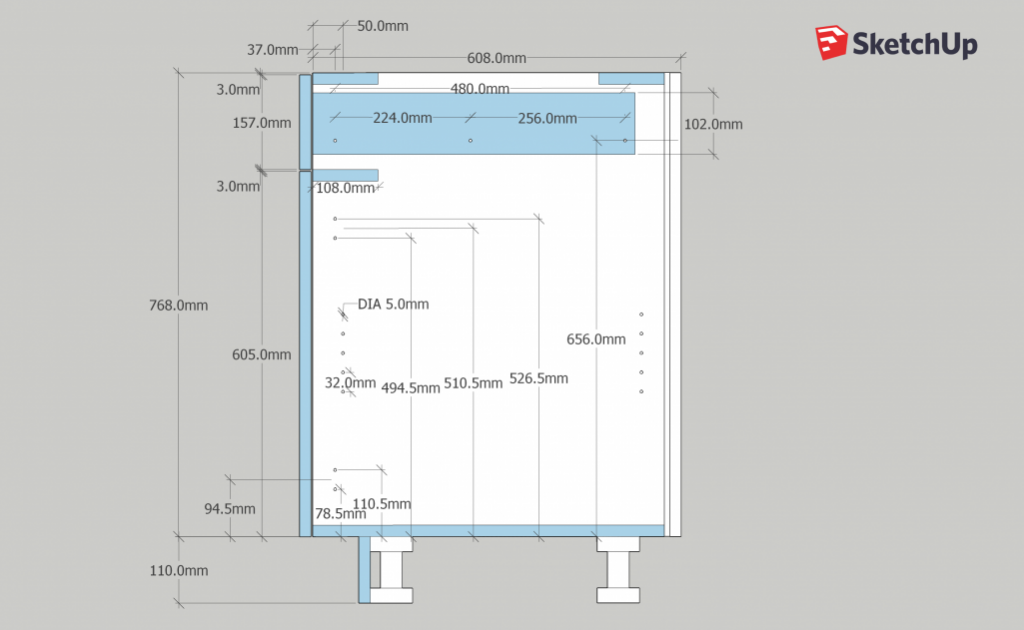
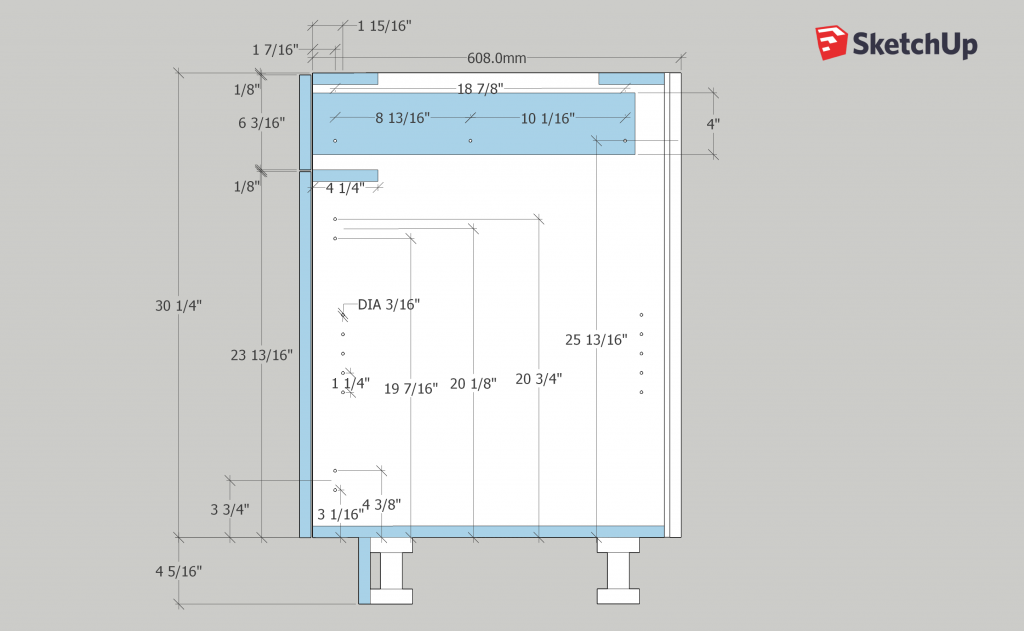
The images below illustrate the drawer guide hole locations for a three drawer stack cabinet using the most common reference point (from the bottom of the drawer front to the center of the 5mm drawer guide hole).
For all drawers that are not in the bottom position, the center of the 5mm holes will be 48mm from the bottom of the drawer front.
For bottom drawers, the center of the 5mm holes will be 58mm from the bottom of the drawer front (to clear the cabinet bottom).
Click Image to Enlarge


These images also illustrate the front to back positions of the 5mm drawer guides holes for a 608mm (23-15/16") deep base cabinet. These holes are positioned based on the drawer guide depth, and for the deeper drawer guides, there are three holes, where the shallow drawers only have two.
The shallowest under-mount drawer guide that Blum makes is a 9" slide, the shallowest cabinet that a 9" drawer guide will fit into is a 294mm (11-1/2"). In KCD, we will not allow you to make any cabinet that has a drawer in it less then 294mm (11-1/2") deep. The following is the drawer guide hole locations front to back for all the various depth drawer guides.
For cabinet depths from 294mm (11-1/2") to 355mm (13-15/16") we will machine for a 9" under-mount drawer guide. There will be one hole at 37mm from the front edge of the cabinet, and a second hole 192mm from the first hole.
For cabinet depths from 356mm (14") to 431mm (16-15/16") we will machine for a 12" under-mount drawer guide. There will be one hole at 37mm from the front edge of the cabinet, and a second hole 192mm from the first hole.
For cabinet depths from 432mm (17") to 507mm (19-15/16") we will machine for a 15" under-mount drawer guide. There will be one hole at 37mm from the front edge of the cabinet, and a second hole 128mm from the first hole, and a third hole 192mm from the second hole.
For cabinet depths from 508mm (20") to 584mm (22-15/16") we will machine for a 18" under-mount drawer guide. There will be one hole at 37mm from the front edge of the cabinet, and a second hole 224 mm from the first hole, and a third hole 192mm from the second hole.
For cabinet depths from 585mm (23") to 661mm (25-15/16") we will machine for a 21" under-mount drawer guide. There will be one hole at 37mm from the front edge of the cabinet, and a second hole 224mm from the first hole, and a third hole 256mm from the second hole.
For cabinet depths from 662mm (26") and deeper, we will machine for a 24" under-mount drawer guide. There will be one hole at 37mm from the front edge of the cabinet, and a second hole 224mm from the first hole, and a third hole 128mm from the second hole.
Read more -
Where do I position my Drawer Fronts on my Drawer Boxes?
Side to side reveal should always be even (centered). To position your drawer box on your drawer front top to bottom, the bottom reveal of a bottom drawer should be 35mm (1-3/8"), the bottom reveal of all other drawers should be 25mm (1").
Click Images to Enlarge
 Read more
 -
How deep (front to back) will my Drawer Boxes be?
The shallowest under-mount drawer guide that Blum makes is a 9" slide, the shallowest cabinet that a 9" drawer guide will fit into is a 294mm (11-1/2"). In KCD, we will not allow you to make any cabinet that has a drawer in it less then 294mm (11-1/2") deep.
For cabinet depths from 294mm (11-1/2") to 355mm (14") we will machine for a 9" under-mount drawer guide, and the drawer box depth will be 9".
For cabinet depths from 356mm (14-1/16") to 431mm (17") we will machine for a 12" under-mount drawer guide, and the drawer box depth will be 12".
For cabinet depths from 432mm (17-1/16") to 507mm (20") we will machine for a 15" under-mount drawer guide, and the drawer box depth will be 15".
For cabinet depths from 508mm (20-1/16") to 584mm (23") we will machine for a 18" under-mount drawer guide, and the drawer box depth will be 18".
For cabinet depths from 585mm (23-1/16") to 661mm (26") we will machine for a 21" under-mount drawer guide, and the drawer box depth will be 21".
For cabinet depths from 662mm (26-1/16") and deeper, we will machine for a 24" under-mount drawer guide, and the drawer box depth will be 24".
Read more -
What height Drawer Box will my cabinets have if I purchase my drawer boxes from Cabinotch?
Drawer Box height (the exterior height of the drawer box from bottom to top) will be determined by the Drawer Front height, and are as follows:
For drawer front heights from 125mm (4.92") to 152.2mm (5.99"), the drawer box will be 76.2mm (3") tall (height).
For drawer front heights from 147mm (6") to 180mm (6.99"), the drawer box will be 102mm (4") tall (height).
For drawer front heights from 177.7mm (7") to 203mm (7.99"), the drawer box will be 127mm (5") tall (height).
For drawer front heights from 203.1mm (8") to 228.4mm (8.99"), the drawer box will be 152mm (6") tall (height).
For drawer front heights from 228.5mm (9") to 253.8mm (9.99"), the drawer box will be 177.8mm (7") tall (height).
For drawer front heights from 253.9mm (10") to 279.2mm (10.99"), the drawer box will be 203mm (8") tall (height).
For drawer front heights from 279.3mm (11") to 304.6mm (11.99"), the drawer box will be 203mm (9") tall (height).
For drawer front heights from 304.7mm (12") and taller, the drawer box will be 254mm (10") tall (height).
Read more -
Current Release V3.02 - 4.13.23
3.02 UPDATE - 4.13.23
System Optimization Update with NEW Catalog items and Material Choices for Slab Doors
- Removed rendered 3D model of BLUM Undermount Drawer Slides in cabinet models.
- Done to ensure models are less taxing on our customer’s PCs and web browser. May improve some speed in loading 3D render.
- NEW Catalog Item:
- Added Drawerbox
- Item that is explicitly a Dovetailed Drawer Box and Drawer Slides
- Should limit the necessity to create separate “bids”/”orders” via the ‘Cabinotch Drawer Boxes’ portal for drawers or “rollouts” which are needed in addition to those which automatically populate with each cabinet.
- Added “Trash Base”
- Model defaulted to have a full depth fixed shelf under top drawer opening, no hinge drilling, or adjustable shelf.
- Modified Existing Catalog Items:
- L-Shaped Molding & Toe-Kick
- Gave ability to order both in 48” length option instead of exclusively 96” length in previous update.
- L-Shaped Molding & Toe-Kick
- Added Drawerbox
- NEW Door/Fronts Material Type Choice Set:
- Added “Cabinotch-Economy” Choice set for Door/Fronts Material Type
-
- This option will allow customers to choose Melamine materials which Cabinotch previously has had on offer for the cabinet carcase. All three of these materials are an engineered core, with melamine
-
- White Melamine
- Fog Gray Melamine
- Hard Rock Maple Melamine
-
- This option will allow customers to choose Melamine materials which Cabinotch previously has had on offer for the cabinet carcase. All three of these materials are an engineered core, with melamine
-
- Added “Cabinotch-Economy” Choice set for Door/Fronts Material Type
- Other bug and coding fixes
3.01 UPDATE - 1.25.23
Minor Update
- QUALITY OF LIFE FIX
- Added "X-Ray" functionality into cabinet rendering. Customer's can now see through cabinet door(s)/front(s) to view machining on interior of cabinet.
- KNOWN BUGS/ISSUES: *Pending FIX unless otherwise noted*
- “Base Sink Full Height Door(s)”, if selection for ‘Hinge Placement’ = None, cabinet Top Rail is shown outside of cabinet bounds and part is missing machining for fasteners. Solution: Instead of changing Hinge Placement to ‘None’, make affect instead to Door Swing and make that selection ‘None’ to remove Hinge Plate Machining.
- Door/Fronts Type Selection "Cabinotch-Stevenswood" → "Pure White 388-Ashland" incorrectly states it is available in a “Warm Finish”. Cabinotch has on offer a “Matte Finish”
- MINOR BUG/CODING FIXES
3.0 RELEASE - 1.13.23
Major release update. Brings NEW Material Options for cabinet components as well as introduction Slab Doors and Drawer Fronts!
**Cabinotch has partnered with two new vendors in order to provided 20 NEW TFL products in a variety of colors and textures. Please visit our https://magento-249149-4350068.cloudwaysapps.com/faq/category/faq-full-access-cabinetry-webstore.html page for a full breakdown of these offerings or contact our sales and customer service team via email or phone.
- QUALITY OF LIFE FIXES
- Full Access Cabinet system now allows for "Managing Presets"
- Can change and apply multiple presets inside of the same project.
- At the “Configure Item” screen the cabinet cost is broken down to include:
- Cabinet Price (All wood, melamine, or TFL cabinet box components)
- Total Price (Cabinet Price plus Drawer Box plus Door/Front as well as fasteners used for cabinet assembly, IE: Lamello Fasteners or Wood Dowels)
- Multiple 'calculated fields' not previously visible are now included. For example, interior cabinet depth on corner cabinets.
- Full Access Cabinet system now allows for "Managing Presets"
- MINOR BUG/CODING FIXES
Read more - Removed rendered 3D model of BLUM Undermount Drawer Slides in cabinet models.
-
Previous Release V2.0 - 10.26.21
2.0 Release - 10.26.21
Major system update including Quality of Life and Bug Fixes as well as several NEW options
- QUALITY OF LIFE FIXES
- Presets which were applied at the Project Preset screen are now collapse (expandable via the "Show/Hide Presets" button at the Configure Item screen.
- Terminology for previously confusing 'Integral Parts Material' changed to read 'Exterior Parts Material'.
- NEW OPTIONS
- Added option to have "Finished Ends" which are "Integral" under the 'Side Type' choice set.
- Added Lamello Clamex as a "Construction Method"
- Added Machining for Axilo Legs as a "Toe-Kick Machining" option.
- Added "Replace Top/Mid-Stretcher" option to include choice for "Full Top"/"Full Depth"
Read more - QUALITY OF LIFE FIXES
-
BETA Release V1.0 - 4.28.21
BETA LAUNCH V1.0 - 4.28.21
Added NEW "Full Access Cabinets" Project Configurator system to Cabinotch.us Webstore
Gives users ability to specify project presets which will hold through to all cabinets being added from NEW Catalog for Full Access Cabinets. Users are presented with a Live 3D Rendering when configuring each item for project. Cabinet box will also be Priced Live as parameters for cabinet are manipulated.
- NEW Options for "Fog Grey" and "Hardrock Maple" melamine.
- NEW "Construction Methods" including an alternate pilot-hole diameter of 5mm , traditional wood dowel fasteners (included), as well as an option for No Connector.
- NEW Options for Full Depth Lineboring, a cluster of 3 holes/shelf, or a cluster of 7 holes/shelf.
- NEW Options for No Back, Zero Scribe for Back, or Nailers both with and without Scribe.
- MORE!
Read more